Sunday, October 28, 2012

Recipe Test - Comfort Noodles (with Shrimp)


My good friend pointed me to this recipe on Melissa Joulwan's recipe blog theclothesmakethegirl.com. She also recommended we add in some shrimp which is exactly what we did. This recipe is perfection, and suprisingly, the best part of it wound up being the scrambled eggs. Weird, I know. So the only change we made was to add in shrimp and scallions, and double to triple the whole thing to feed both of us for dinner with leftovers (as Melissa just whipped this up quick for herself only).

There's really no need to say any more. Just make it. It's awesome.

Ingredients:
  • 4 - 6 zucchini, julienned (we used summer squash as the yellow makes your brain think it looks like real pasta)
  • generous 3/4 - 1 teaspoon salt
  • 2 tablespoon almond flour or almond meal
  • 1 teaspoon coconut oil
  • 2-3 tablespoon extra-virgin olive oil
  • 3 cloves garlic, crushed
  • 1 bunch scallions (sliced thin, white and light green parts only)
  • 6 eggs, scrambled
  • a handful of fresh parsley, minced for garnish (optional - I left it out because I didn't have any on hand)
  • salt & pepper, to taste
  • 1 pound raw shimp, peeled and de-veined
  1. Place the julienned zucchini in a colander or wire strainer and toss with the salt until coated. Allow to sit for 20 minutes to drain excess water, then rinse and pat dry with paper towels. (Melissa advises you do this step to improve the overall quality of your zucchini noodles. Those of you that make zucchini noodles know how watery they can get if you don't sweat them with salt like this first.)
  2. While the zucchini is sweating in the colander, heat a large skillet over medium-high heat. Mix the almond flour with the coconut oil, sprinkle it with a smidgen of salt, then sauté in the pan, stirring often with a wooden spoon, until it’s toasty brown, about 1 minute. Remove from pan and save for garnish.
  3. Add the shrimp to the pan with a bit of olive oil and saute until just done when they begin to turn opaque. Remove shrimp to a bowl off to the side and drain the liquid out of the pan.
  4. Return the pan to the heat and add the scallions and zucchini noodles. Sauté until just tender, about 1-2 minutes. Push the noodles to the side of the pan, and reduce heat to medium-low. Wait a minute; it’s essential that the pan cools down before adding the eggs. Add the olive oil and garlic. When the garlic is fragrant, about 20 seconds, pour in the eggs and allow them to cook until just beginning to set a tiny bit. Mix the zucchini noodles into the egg and continue to stir gently and continuously until the egg is set and clinging to the noodles. Add the shrimp back to the pan and mix well. Taste, then add salt and pepper to your liking.
  5. Serve noodles in a deep bowl and sprinkle with the almond flour crumbs and minced parsley.


Sweat that zucchini, baby!
Ick... zucchini water
 
Mmmm... almond breadcrumbs!


SCRIMPS!


DON'T OVERCOOK THESE OR THEY WILL BE MUSHY!

This part got a little weird for me, but I swear,
the eggs are the best part of the whole dish.

The idea is to scramble the eggs into the noodles and
give everything a good, eggy coating.

Monday, October 22, 2012

Applesauce


This weekend, my husband and I drove upstate to the apple orchards to pick our own apples. It was a beautiful fall day and we certainly got a workout carting around all those bags. Apple farmers in New York state didn't fare well this year, but we were luckily able to find almost every variety of apple we were looking for. I had in mind I wanted to get apples to make homemade applesauce, try my hand at an apple pie or apple crisp, and a get few extra ones for snacking during the week. For that reason, we picked a variety of tart and sweet apples. Empire, Rome, Cortlandt, Macintosh, Red Delicious, and Fujis overflowed from our bags and came together to make a very delicious applesauce this morning.

Think making applesauce from scratch is hard? Think again! If you get the right mix of apples, you don't need to add any additional sweetener. Just pure, delicious apples fresh from the orchard.

Ingredients
  • Apples (try at least 2 - 3 different kinds - more if you got 'em!)
  • lemon juice (optional)
  1. Wash the apples and core, if needed. (I cut around the core with a knife, but you can use a corer tool. No need to core if you are going to use a food mill, though.)
  2. Slice all the apples. (If your apples will be sitting out, try squirting a bit of lemon juice on them and mix around to prevent them from browning.)
  3. Heat about an inch or so of water in a large stock pot.
  4. Add the apples and bring to a simmer; simmer until the apples are soft.
  5. Use a slotted spoon to add the apples to a food mill*** (or the grinder/strainer attachment on a stand mixer); use the mill to puree the apples and leave the skins and seeds behind. Discard the skins and seeds.
  6. Store applesauce in the refrigerator in airtight containers for up to 2 weeks. (Feel free to serve with some ground cinnamon; you could also add some nutmeg and a few ground cloves!)
***What do you do if you don't have a food mill? You could peel all your apples by hand, and after softening them in the pot, remove them with a slotted spoon to puree in a blender or food processor.


I used about a peck and a half to make this applesauce
(the rest I saved for some baked goodies!)


I core my apples by slicing the sides off around it.

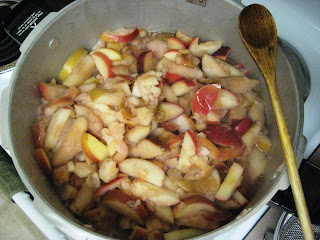
As I slice my apples and toss them in the pot,
I squirt a bit of lemon juice in there and mix it
around to prevent the apples from browning.
It shouldn't affect the taste of your applesauce.

Your apples should be mushy enough to mash
when pressed down with a spoon.

I used the fine grinding blade on my food mill.

The rich delicious applesauce comes out the bottom
while the skins are left behind in the mill.


Our applesauce wound up having a pink tint
because some of our Rome apples had these cute
little red veins running through the flesh of the apple.

My peck and a half of apples made about 5 quarts and 1 pint of applesauce.
NOTE THIS RECIPE IS SAFE FOR CANNING.

Friday, October 19, 2012

The Garlic Trick

My husband and I attended a knife skills class a few weeks ago at the Institute of Culinary Education in New York City. I'd been wanting to take a class like this for a long time now so that I could learn how to properly prep food items, what knives to use for what kind of jobs, and how to care for my knives. We had a wonderful time learning with Chef Brendan and couldn't wait to get home to try out our new skillz. Not only did we learn technique, Chef Brendan also imparted a few tips and tricks. One such trick is how to peel an entire head of garlic in less time than it is taking me to type out this post.

I kid you not. You can peel an entire head of garlic in under a minute.

Continue to scoff, all ye skeptics. But peer below and see how it is done.


First pull off the papery outer layers, then break apart the garlic
into individual cloves and place them in a metal or glass bowl

Once all your cloves are separated you can discard the tough root piece

Cover your bowl with another bowl (if you don't have a bowl
the same size you may be able to use a plate);
SHAKE VIGOROUSLY for about 35 seconds

Check the bowl to see if all the garlic has separated from its skins;
if not, cover and shake a bit more. The goal is to smash the garlic against
the hard surface of the bowl to get it to release from its skin.
Use those muscles!

And in less than a minute you have peeled an entire
head of garlic. Whatever you don't need at the time
can be stored in the fridge in an airtight container
or zipper baggie. It will keep for 1 - 2 weeks.
Note that by doing this the garlic will release some of
its oil making it a bit sticky. That just means you did it right.
Oh yeah. YOU'RE WELCOME.


UPDATE: Note that the best way to store your peeled garlic (that I've found, anyway) is in an airtight glass container. I tried a zipper baggie, but it overwhelmed my fridge with a garlic smell. I tried a plastic airtight container but the garlic got slimy quicker than I would have liked. With the glass container, my garlic stays fresh much longer and I couldn't be happier to have peeled garlic on-hand whenever I need it!

Friday, October 12, 2012

Crema de Calabacin (Cream of Zucchini Soup)

My lovely Spanish mother-in-law introduced me to this thick, delicious soup. I took her recipe and made some very small modifications to suit my own tastes. The soup is more reminiscent of a stew if you ask me, but either way, it's yummy. The first time I made it, I doubled the recipe and made a huge heaping pot which I was able to take to work for lunch everyday. You could also freeze some and defrost it in a pinch.
There are so many different variations of this soup floating around out there, from strictly creamy with fewer ingredients, to quite hardy like the one I've posted here. There's also a similar soup that uses actual squash blossoms which I'd love to try one day.
Buen provecho!

Ingredients
  • 3 medium white sweet potatoes, peeled and cubed
  • 3 zucchini, cut in chunks
  • 4 - 5 carrots, peeled and cut in chunks
  • 1 large onion, quartered
  • 3 - 5 garlic cloves, peeled
  • 2 leeks, cut in 3" chunks
  • 2 chicken breasts, bones and skin removed
  • 2 - 3 quarts low sodium chicken broth, vegetable broth, or water
  • kosher salt and fresh ground black pepper, to taste
  • dried herbs, like thyme and rosemary, to taste
  1. Place the vegetables and chicken breast in a large stock pot or dutch oven. Pour in enough broth or water to just reach the top of the veggies and bring the pot to a boil. Once boiling, lower the heat and simmer for about 45 minutes until the vegetables are soft.
  2. Remove the pot from the heat and ladle a bit of the liquid into a separate bowl to save for possible use later. Drain off the rest of the liquid. Puree the chicken and veggies together with a food processor, blender, or stick blender until it reaches your desired consistency. If you want to make it a little "soupier" you can introduce some of the reserved cooking liquid back into your mixture.
  3. Season the soup liberally with salt and pepper until it reaches your desired taste. Do the same with some dried herbs like thyme and rosemary. Even herbes de provence would work. 
  4. Spoon it into bowls and serve hot.
believe it or not, this is what a real sweet potato looks like;
the orange ones are actually yams
cube up those spuds!

start tossing everything into the pot together

your cutting job doesn't have to be perfect...

cover the veggies and chicken with liquid and crank
it up to boil


eventually it will all get soft and ready to blend


save a bit of that broth in case you want to make
your soup not quite so thick

what a mess, I know


I like my stick blender because it leaves me
less to clean...

I don't mind leaving it a little chunkier.


Tuesday, October 9, 2012

Apple and Sage Pork Chops

 
One of my favorite things about fall are that apples are in season! Apples are such a versatile fruit - they can go from breakfast to dinner to snacks to dessert. You can mash them, roast them, bake them, eat them raw, dip them... there really isn't much you can't do with an apple.
 
This recipe takes after one of those McCormick Spice Company pre-packaged spice mixes. I've adjusted some of the amounts and the ingredients themselves to arrive at this great (and quick!) fall recipe.
 
Ingredients
  • 8 boneless pork chops, 1 inch thick
  • 2 Tbsp coconut flour
  • 2 tsp sea salt
  • 3 tsp dried ground sage
  • 2 tsp garlic powder
  • 2 tsp dried thyme leaves 
  • 1 tsp ground allspice
  • 1 tsp paprika
  • 3 Tbsp coconut oil
  • 2 medium onions, thinly sliced
  • 4 red apples, thinly sliced
  • 1 cup apple cider
  • 2 Tbsp palm sugar (optional)

1. Mix the coconut flour, all of the spices, and salt in a small bowl with a fork. Sprinkle both sides of the pork chops with 2 tablespoons of the seasoned flour.

2. Heat the coconut oil in a large lidded skillet over medium-high heat. Brown the pork chops on both sides and remove to a plate. Add the onions to the pan; cook and stir 1-2 minutes or until just tender. (Add more coconut oil, if needed.) Add the apples; cook and stir another 1-2 minutes.

3. Pour in the cider, and using your wooden spoon, deglaze the pan by scraping up any brown bits that stuck to the bottom. Stir in the palm sugar and remaining seasoned flour until well mixed. Nestle the pork chops into your mixture and pour in any accumulated juices to the pan. Bring to a boil. Reduce heat to low(ish); cover and simmer 5 minutes or until desired doneness.

Easily core apples by cutting each side off until you are left with
a rectangular core

mmmm... spices!

Brown those choppers


Palm sugar is reminiscent of brown sugar and I use it as
a substitute in most recipes that call for brown sugar 


FIN!