Showing posts with label Side Dishes. Show all posts

Monday, February 2, 2015

Mint Cauliflower "CousCous"


Cauliflower is our token grain replacement for Paleo eaters. It makes a great rice or couscous, and mashes nicely like a potato. This incredibly simple recipe has hints of mint and lime and pairs excellently with lamb.

Ingredients
  • Extra virgin olive oil
  • 1 head cauliflower
  • 1/2 cup - 3/4 cup chopped fresh mint leaves
  • 1 lime, quartered
  • 3-4 scallions, sliced thin
  • salt and pepper to taste
  1. Pre-heat oven to 400F and grease a foil-lined sided baking sheet with a bit of oil.
  2. Core the cauliflower and cut it into florets. Pulse in the food processor in batches until your cauliflower has a couscous or rice-like shape and consistency. (Don't overload or some pieces won't hit the blade.) If you don't have a food processor, you can use a box grater.
  3. Spread the cauli-rice evenly on the pre-greased foil-lined pan and drizzle with a bit more oil. Bake for 20 minutes, or until slightly golden. Don't brown it. Stir halfway through baking to ensure even cooking.
  4. Transfer the cauliflower to a large bowl and mix in the scallions, 1/2 cup mint, and juice from two of the lime wedges. Add a pinch of salt, a bit of pepper, and drizzle with a bit of olive oil to lightly coat. (Don't soak with oil!) Mix it up and check for flavor. Depending on the size of your head of cauliflower, you may need to add more mint or more lime, or salt/pepper, etc. 
  5. Adjust the seasonings to your liking and serve!


Don't overload your food processor

Nice rice-like consistency

Ready for the oven!

Take it out before it browns. It should be soft enough to eat.

Cauliflower ranges in size, so adjust your seasonings as needed.

τέλος!
(FIN!)

Saturday, May 24, 2014

Broiled Broccolini


Broccolini is one of those weird hybrid vegetables that's a cross between broccoli and a chinese vegetable called kailaan. It may be an abuse of nature, but it's a delicious one. Summertime really isn't the ideal time to use your oven, but that's why this recipe is great because it only takes 10 minutes under the broiler, and you're done.

Ingredients

  • 1 bunch broccolini
  • extra virgin olive oil
  • salt, pepper, garlic powder to taste
  • juice of half a lemon (optional)
  1. Wash and dry the broccolini. If the bottom of the stems are rusty or discolored, trim them off, otherwise you can leave them be.
  2. Line a large sided baking sheet with foil and drizzle with a bit of olive oil. Line up the broccolini stems on the sheet (I tend to alternate the leafy side up vs down to make more room). (Pan should be broiler-safe.)
  3. Drizzle with more olive oil and season with salt, pepper, and garlic powder, to taste. If you appreciate a bit of lemon, you can also squeeze on the juice of half a lemon at this point. 
  4. Put the pan in the oven under a high broiler for 10-12 minutes. Until the tops are browned and slightly crispy. mmmm... crispy tops


Saturday, November 23, 2013

Stuffed Artichokes

It probably sounds weird, but artichokes remind me of the holidays. My mom or grandma would stuff a batch and serve them with our Thanksgiving turkey or Christmas feast and I always looked forward to it. I didn't realize until I was much older that most families don't cook up a batch of stuffed artichokes for their celebrations. My husband had never eaten one until he came to one of our holiday events. Really. So if you are an artichoke novice, fear not. They are delicious and a cinch to prepare.

The edible part of the artichoke is disproportionate to its actual size. There's a teensy bit of meat on the bottom of every leaf you pull off, which we all toil away to scrape off with our teeth. Then once all the leaves are peeled away you get down to that succulent treasure trove at the bottom - the heart. There are these little fiber-y hairs encasing the top of the heart which pull off easy. Then it's go time. It's your reward for making it to the end of the journey. And what a pleasant journey it was.

The classic recipe uses breadcrumbs and even some Parmesan cheese. By swapping breadcrumbs with a deliciously seasoned almond meal you go from a carb-loaded dish to one with more protein. Artichokes by themselves are an antioxidant superfood and rank among the highest for total antioxidant capacity. So why ruin it with all those irritating gluten-y breadcrumbs? Need I give you another reason to eat a darn artichoke?


Note, you'll need 2 cups seasoned almond flour (see post: Italian Seasoned "Bread" Crumbs, or the below recipe).

 ITALIAN SEASONED "BREAD" CRUMBS
Ingredients
  • 2 cups almond flour/meal
  • 1 tsp sea salt
  • 1 tsp parsley
  • 1 tsp black pepper
  • 1 tsp garlic powder
  • 1/2 tsp onion powder
  • 1/2 tsp dried oregano
Mix all ingredients in a large bowl until thoroughly combined.

---------------------

ARTICHOKES
Ingredients
  • 4 large artichokes, trimmed
  • lemon juice (optional)
  • 2 cups Italian seasoned "bread" crumbs (see recipe)
  • 8 cloves garlic, smashed with the flat of your blade and minced
  • 4 Tbsp extra virgin olive oil
  • boiling water
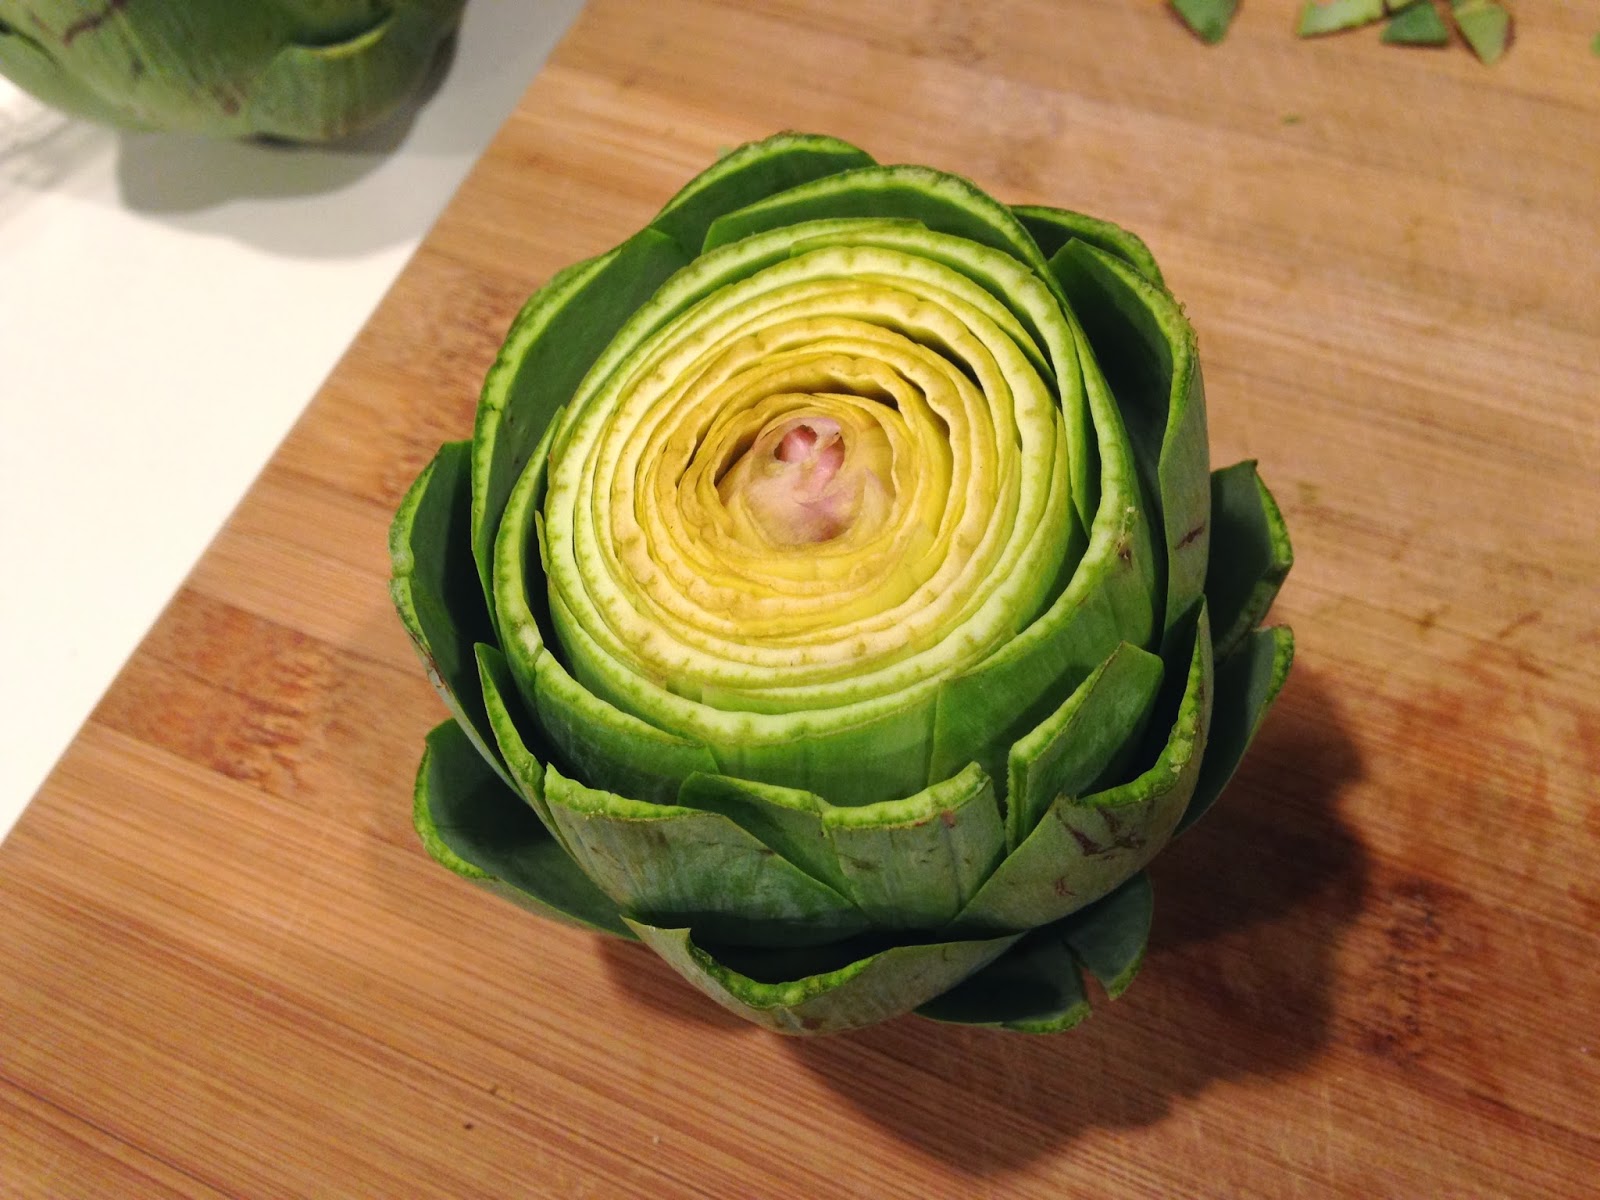
  1. Prepare your artichokes. Cut off the stems so they will stand upright. Slice off the top third of the artichokes and pull off some of the tough outermost leaves. Trim off the pointed tips of the remaining leaves with kitchen shears. Turn the artichoke cutside-down, and with a firm grip on the base, bang the artichoke against your cutting board to open the leaves. Rub cut parts with a little lemon juice, if desired, to keep from turning brown. Use your thumbs to open the leaves the rest of the way to make room for stuffing and set aside.
  2. Heat oven to 425° F and set a small stock pot of water to boil. 
  3. In a large bowl, combine bread crumbs and garlic. Stuff one artichoke at a time by scooping out 1/2 cup of stuffing, placing the artichoke in the bottom of the bowl and sprinkling with the 1/2 cup of stuffing. Use your fingers to work the stuffing in between the leaves. You may not have to use the entire 1/2 cup for each artichoke because the size of your 'chokes may vary. Just ensure you get a bit of the stuffing between each of the outer leaves and in the top.
  4. Transfer stuffed artichoke to a baking dish. Continue until all artichokes are stuffed and placed in the baking dish. 
  5. Drizzle each artichoke with 1 Tbsp oil. Pour in boiling water from the stock pot to fill the dish about an inch high. Cover securely with aluminum foil and bake about 45 minutes. Check for tenderness by sliding a knife easily through the base of the artichokes. Once tender, uncover and broil for about 3 more minutes, or until the artichokes turn golden brown. Serve warm.


Cut off the stems to create a nice flat base and pull off some of the tougher outer leaves.

Trim off the top of the 'choke (about a third of the way down)

Snip off the pointed tips from each leaf

Knock your 'choke against a hard surface to get it to open up

Use your fingers to separate the rest of the way

If you don't already have your "bread" crumbs, mix up 2 cups' worth

Pour about a 1/2 cup crumbs over each artichoke and use your fingers to work it into the leaves


Drizzle each with 1 Tbsp olive oil

Almost ready to go!

Don't forget to add about 1" of boiling water to the pan

Cover tightly with foil and bake about 45 min

After a quick broil, them 'chokes is done!

Mmmm... artichokes


Sunday, June 30, 2013

Sauteed Cremini Mushrooms with Lemon, Capers, and Garlic

It wasn't until I became an adult that I really started to appreciate mushrooms. As a kid, I would pick them out of whatever meal they were in and isolate them from the rest of my food. My favorite mushrooms nowadays are portobellos (big mushrooms) and baby bellas (smaller relation of the portobello aka cremini or crimini). I've grilled them, broiled them, stuffed them, mixed them in chili and marinara, but not really given them a good saute. I was in an experimenting type of mood and came up with a delicious new way to showcase these bite-sized little fungi.

Ingredients
  • 16oz whole cremini mushrooms, wiped clean with damp paper towels
  • 1 Tbsp grapeseed oil
  • 1 Tbsp clarified butter (can substitute with another Tbsp of grapeseed oil)
  • Juice of half a lemon
  • 2 Tbsp capers, drained
  • 3 cloves garlic, minced
  • 1/4 tsp dried thyme
  • Fresh ground pepper, to taste
  1. Slice the mushrooms in half lengthwise through the stem and cap (any larger mushrooms should be cut in quarters) 
  2. Heat the grapeseed oil and butter on the stove in a pan over medium-high heat until the butter begins to froth.
  3. Add the mushrooms to the pan and saute 5+ minutes until just soft.
  4. Add the remaining ingredients to the pan and saute a few minutes more until flavors combine and mushrooms are fork-tender.
When cleaning my 'shrooms with paper towels, most of that dark skin came off revealing the delicate white meat underneath.

2Tbsp probably feels like a lot of oil/butter, but these little sponges will soak it up.

Prepping my capers and fresh lemon juice.

Adding the rest of the ingredients to the pan.
Ready to enjoy!

Saturday, December 22, 2012

Acorn Squash Halves


I like acorn squash because it comes ready to eat in its own little "bowl".  It makes for an interesting presentation on your dinner table. You can make one squash half per person (which is what I do because I looooooooove me some acorn squash) or you can cut the roasted halves in half when serving so that one whole squash will serve four people. The choice is yours.

Ingredients
  • 1 acorn squash
  • grapeseed oil or melted coconut oil
  • 1 Tbsp clarified butter, divided (or you could substitute additional coconut/grapeseed oil if you don't do dairy)
  • 2 tsp agave nectar honey, divided
  • palm sugar
  • salt and fresh ground pepper to taste
  1. Preheat oven to 400F.
  2. Slice the acorn squash in half, lengthwise, from stem to end. Use a sturdy spoon to scoop out the seeds and innards. Take a sharp knife and score the inside several times.
  3. Brush the exposed squash meat with grapeseed or coconut oil to prevent burning. Fill each inner cavity with 1/2 Tbsp butter, 1 tsp agave honey, and 2 generous pinches of palm sugar. Sprinkle some salt and pepper, to taste. (You could even spice it up a bit more by sprinkling some cinnamon, ground cloves, or nutmeg as well.)
  4. Place squash cut-side-up in a baking dish filled with 1/2" water. Roast in the oven for about 1 hour - 1 hour 20 min. The squash should be very soft, the top browned. Halfway through baking, spoon the sweet buttery sauce over the squash meat to distribute the flavors.
  5. Serve one half for each person, or cut the halves in half, taking care to split the buttery sauce between each half.
    FIN!

I like to use my large serrated knife to cut squash.

Scoop out the innards, just like you would for a pumpkin.

Don't forget to score your halves with a knife before filling!
(I always forget and wind up having to cut through butter and
sticky honey right before baking.)


And yup, forgot to score the squash. Gotta do it now.
Don't judge me.

Very important to fill your baking dish with water
so the squash stays moist and doesn't burn.

Wednesday, July 4, 2012

Roasted String Beans with Cherry Tomatoes and Shallots

Now that we have progressed into summer I am so happy to hit the produce section in the grocery store each week. Without fail, I have to pick up a carton of yummy heirloom cherry tomatoes. In addition to being delicious and each having their own unique flavor, their different shades of color really class up whatever dish you put them in. I had some string beans sitting in my vegetable drawer right next to the tomatoes so it wasn't hard to put two and two together that these babies needed to hop in the roasting pan together. You can probably get this whole thing into your oven in about 5 minutes.

Ingredients
  • 1.5lb string beans, washed and trimmed
  • 2 pints of cherry tomatoes (preferably heirloom)
  • 3 large shallots, peeled and thickly sliced vertically
  • Extra virgin olive oil
  • Salt and fresh ground pepper, to taste
  • Fresh herbs of your choice (I used chopped tarragon, rosemary, and lemon thyme)
  1. Preheat oven to 400F.
  2. Combine the string beans, cherry tomatoes, and sliced shallots in a large roasting pan.
  3. Drizzle the vegetables with olive oil.
  4. Sprinkle with a few pinches of salt and some fresh ground pepper, to taste.
  5. Take any fresh herbs you like and sprinkle them over top. (you could substitute with dry if that's all you have - thyme and rosemary work well)
  6. Give the pan a good few shakes to mix and coat the veggies in oil. (You could even add a few splashes of lemon juice for some extra flavor.)
  7. Roast about 25-30 minutes on a middle rack in the oven, until the string beans are soft and the tomatoes have blistered. Check the pan a few times while roasting and shake again to coat with the oil so none of the veggies burn.
Before

After

Monday, June 18, 2012

Tostones (Fried Plantains)


Tostones are fried green plantains which are very popular in Latin American households (and especially Puerto Rico). Unlike their yellow plantain cousins, they are not sweet. Tostones are so easy to make my husband actually prepares them all the time (and he's better at it than me). We like them to come out crispy and sprinkle them generously with salt. I usually burn my tongue because I am too impatient and want to eat them hot out of the pan. Tostones make a great side dish or snack but are also impressive served as an appetizer. I generally prepare 1 plaintain per person depending on the size of the group.

Ingredients:
  • 2-3 ripe green plantains
  • coconut oil
  • sea salt
  1. Remove the peel from the plantains. It's not like peeling a regular banana and will be quite difficult to remove that way. Start by cutting off both ends of the plantain. Using your knife, slice down the length of the plantain taking care not to go too deep into the meat of the fruit. Make another long incision about an inch or two parallel to the first. You should now be able to peel off that inch wide piece of peel. Once that is removed, you should be able to peel away the rest.
  2. Slice crosswise into 1" pieces.
  3. Heat a few tablespoons of coconut oil in a nonstick frying pan on medium-high heat.
  4. Fry the plantains a few minutes on each side until starting to brown.
  5. Remove the pieces from the heat and place on a piece of parchment paper. Cover with another piece of parchment paper. Find an object (I use a mustard jar) to smash the plantains down flat. You want to get them about a half inch thin otherwise they won't get crispy. Return the flattened plantains to the pan and fry again on either side until brown and crispy.
  6. Sprinkle very generously with salt and serve immediately.
[These would be delicious served with a garlic alioli sauce for dipping!]