Showing posts with label Condiments/Dressings/Toppings. Show all posts

Tuesday, November 12, 2013

Italian Seasoned "Bread" Crumbs (aka almond flour)

It's no secret that almond flour/meal is our substitute for bread crumbs in most all recipes. Before Paleo, I always purchased the big tub of Italian style breadcrumbs and used it for everything from chicken cutlets to stuffed mushrooms. It's actually very easy to spice up your almond flour to be a very close substitute. The below recipe will yield one cup of seasoned almond flour and you can double, triple, quadruple to your heart's desire. I typically use the almond meal from Trader Joe's. It's cost effective and they don't blanch the almonds which gives the meal more of the look of breadcrumbs and helps trick the mind even more.

You might want to get started making a batch of these now. Or two. I'm not saying my next post could include these as a main ingredient... but I'm not not saying it either.

Ingredients
  • 1 cup almond flour/meal
  • 1/2 teaspoon sea salt
  • 1/2 teaspoon black pepper
  • 1/2 teaspoon garlic powder
  • 1/2 teaspoon dried parsley
  • 1/4 teaspoon onion powder
  • 1/4 teaspoon dried oregano
Mix all ingredients together in a small bowl with a mini-whisk or fork until thoroughly combined. Use immediately or store in an airtight container.


Wednesday, October 16, 2013

Fig Balsamic Vinaigrette Dressing (or any fruit flavor!)


Before I launch into my tirade of how much I love this dressing, I first have to say SORRY for taking so long to post. THREE MONTHS! Well, as you know we bought our first home and moved in late July. It took a while to get unpacked and we're still not completely there, but I finally have a kitchen with WINDOWS. droooooooool

The kitchen itself is in dire need of updating. The cabinets are original from the 1950s and falling apart. Literally. I opened the cutlery drawer the other night and the drawer face came away with no drawer attached to it. But we're making do until at least the end of the year. After the holidays we'll start talking budget and updating. But, without further ado, let's get on with this recipe.

I love vinaigrette dressing for salad but can't really find any store-bought dressing without a bunch of gunk in it. I used to get the Italian salad dressing mix in a pouch that comes with its own cruet. After I converted to Paleo I just drizzled oil and vinegar on every salad I ate. That lack of variety can sometimes get boring which is why I started experimenting with making my own dressings. I don't think I'm reinventing any wheels here, but my goal was to be able to come up with a delicious dressing alternative with ingredients that are readily available at almost any time in any kitchen. This recipe is the bare bones basic and can be dressed up further in any number of ways. The secret is the fruit spread.

Jams and jellies are pretty much verboten when it comes to Paleo because of all the added junk they put in there. I have found a few brands that make fruit spreads sweetened with fruit juice instead (apple or grape) and without adding all the processed junk. I like to stock up on all varieties of these spreads every year when I go apple picking in upstate NY, but recently I found my local Trader Joe's is now selling their own natural organic (and Paleo-friendly) preserves. YAY! If you're really stuck, you can order these Fiordifrutta preserves online through Amazon (I recommend you buy in bulk, though, or get killed with shipping).

Fresh from the orchard...

Fresh from, umm, the store...


'gredients!

Ingredients

  • 1 Tbsp fruit spread of your choice (fig, raspberry, strawberry, etc)
  • 1/4 cup extra virgin olive oil
  • 1/8 cup balsamic vinegar (I used white balsamic, but regular balsamic is fine)
  • 3/4 tsp course grain kosher salt
  • 3/4 tsp garlic powder
  • 1/8 tsp fresh ground pepper
  1. Whisk all ingredients in a small bowl until combined.
  2. Dressing is ready to serve immediately!
  3. Store extra in the refrigerator in an airtight container. The olive oil will congeal a bit when cold, so let the dressing sit out a few minutes to "melt" again prior to serving.
Try serving over Autumn Salad!

Wanna dress this baby up? Try adding some herbs to the mix. Dried oregano or fresh torn mint leaves will take your dressing TO THE MAX!
mixing up the fig balsamic dressing...

mixing up the raspberry balsamic dressing

Mmmm... figgy


Sunday, May 19, 2013

Worcestershire Sauce


I usually shy away from recipes with Worcestershire Sauce because it bothers me that this little staple condiment contains processed sugar. Then I decided it can't be too hard to mimic the flavor and made my own. This mixture is a pretty decent substitute and can be kept in a jar ready to marinate your meats and mix into your sauces and dressings!

Ingredients:
  • 1/2 cup apple cider vinegar
  • 2 Tbsp water
  • 2 Tbsp coconut aminos
  • 1 Tbsp palm sugar (aka coconut crystals)
  • 1/4 tsp garlic powder
  • 1/4 tsp onion powder
  • 1/4 tsp mustard powder
  • 1/4 tsp powdered ginger
  • 1/8 tsp cinnamon
  • a few rounds of fresh ground pepper
  1. Add all ingredients to a small stock pot or gravy pot and bring to a boil. Allow to boil for about 45 seconds or so and remove from heat. 
  2. Cool completely then store in an airtight container. 
It goes right from my little pot into a clean (re-used) jar.

A little masking tape for a label and I stick it right on my fridge door.


Sunday, March 24, 2013

Red Pepper Spread (Trader Joe's Knock-off)


I used to love Trader Joe's Red Pepper Spread, but I had to stop eating it once I went Paleo because it is made with sugar. After walking through Trader Joe's one Saturday and once again walking past the jars of Red Pepper Spread, I finally decided it was time to make my own version. To my surprise, it tasted JUST LIKE THE ORIGINAL!

This is an incredibly versatile spread - perfect for smearing on Paleo crackers, using as a marinade for chicken, mixing into sauces, dressing burgers - so many uses!

Ingredients
  • 1 large eggplant
  • 2 red bell peppers, seeded
  • 3 garlic cloves, still in their skins
  • extra virgin olive oil
  • 1 tsp raw honey
  • salt and pepper to taste
  1. Preheat oven to 400F.
  2. Dice the eggplant and red peppers into 1 inch pieces.
  3. Spread eggplant and peppers onto a nonstick sided baking sheet or roasting pan and drizzle with olive oil. Place the garlic cloves in the pan and place the pan in the oven. Roast for 40 minutes, or until the the vegetables are browned and soft. You may have to toss them once or twice when they are roasting to promote even heat distribution.
  4. Place the roasted eggplant and peppers in a food processor. Push the garlic out of the skin and add to the food processor (discard the skins). Add the honey and process until smooth.
  5. Mix in salt and pepper to taste. You can eat this warm, or serve chilled.


Monday, October 22, 2012

Applesauce


This weekend, my husband and I drove upstate to the apple orchards to pick our own apples. It was a beautiful fall day and we certainly got a workout carting around all those bags. Apple farmers in New York state didn't fare well this year, but we were luckily able to find almost every variety of apple we were looking for. I had in mind I wanted to get apples to make homemade applesauce, try my hand at an apple pie or apple crisp, and a get few extra ones for snacking during the week. For that reason, we picked a variety of tart and sweet apples. Empire, Rome, Cortlandt, Macintosh, Red Delicious, and Fujis overflowed from our bags and came together to make a very delicious applesauce this morning.

Think making applesauce from scratch is hard? Think again! If you get the right mix of apples, you don't need to add any additional sweetener. Just pure, delicious apples fresh from the orchard.

Ingredients
  • Apples (try at least 2 - 3 different kinds - more if you got 'em!)
  • lemon juice (optional)
  1. Wash the apples and core, if needed. (I cut around the core with a knife, but you can use a corer tool. No need to core if you are going to use a food mill, though.)
  2. Slice all the apples. (If your apples will be sitting out, try squirting a bit of lemon juice on them and mix around to prevent them from browning.)
  3. Heat about an inch or so of water in a large stock pot.
  4. Add the apples and bring to a simmer; simmer until the apples are soft.
  5. Use a slotted spoon to add the apples to a food mill*** (or the grinder/strainer attachment on a stand mixer); use the mill to puree the apples and leave the skins and seeds behind. Discard the skins and seeds.
  6. Store applesauce in the refrigerator in airtight containers for up to 2 weeks. (Feel free to serve with some ground cinnamon; you could also add some nutmeg and a few ground cloves!)
***What do you do if you don't have a food mill? You could peel all your apples by hand, and after softening them in the pot, remove them with a slotted spoon to puree in a blender or food processor.


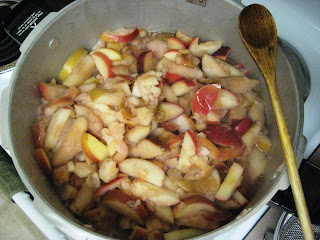
I used about a peck and a half to make this applesauce
(the rest I saved for some baked goodies!)


I core my apples by slicing the sides off around it.

As I slice my apples and toss them in the pot,
I squirt a bit of lemon juice in there and mix it
around to prevent the apples from browning.
It shouldn't affect the taste of your applesauce.

Your apples should be mushy enough to mash
when pressed down with a spoon.

I used the fine grinding blade on my food mill.

The rich delicious applesauce comes out the bottom
while the skins are left behind in the mill.


Our applesauce wound up having a pink tint
because some of our Rome apples had these cute
little red veins running through the flesh of the apple.

My peck and a half of apples made about 5 quarts and 1 pint of applesauce.
NOTE THIS RECIPE IS SAFE FOR CANNING.

Saturday, June 23, 2012

Grilled Steak with Sesame Sauce and Grilled Scallions


I picked up the summer eats edition of Fine Cooking Magazine and am using it for tons of inspiration. Last week I made a delicious paleo-friendly version of their sesame sauce for grilled steak and scallions. Asian cooking is way out of my comfort zone but I've been trying hard to expand my horizons and am extremely pleased with how this dish came out. It's also the first time I've used my bottle of organic coconut aminos, so that was pretty exciting.

Ingredients
  • 1.5lb steak (flank, skirt, london broil)
  • kosher or sea salt and freshly ground pepper
  • 1/4 cup plus 1 Tbsp organic coconut aminos
  • 1/4 cup grapeseed or olive oil, plus more for the grill
  • 1/2 tsp and 1/2 tsp ground ginger
  • 3 cloves garlic and 2 cloves garlic, crushed
  • 3 Tbsp apple cider vinegar
  • 2 Tbsp Asian sesame oil
  • 1.5 Tbsp palm sugar (or use honey)
  • 1 tsp organic arrowroot powder
  • 1/3 cup water and 1 tsp water
  • 20 scallions, roots trimmed
  • 1 Tbsp toasted sesame seeds
  1. Season the steak with salt and pepper.
  2. In a small bowl, mix 1 Tbsp coconut aminos with 1/2 tsp ginger, 1 Tbsp grapeseed oil, and 3 cloves of the crushed garlic. Pour into a large zipper bag. Seal the steak inside the bag and massage the marinade into the meat. Refrigerate for a few hours, or overnight.
  3. In a small saucepan, heat 1.5Tbsp of the grapeseed oil, 2 cloves crushed garlic and 1/2 tsp ground ginger over medium heat until garlic begins to brown around the edges. (Don't let the garlic burn.) Add 1/3 cup water, the remaining 1/4 cup coconut aminos, vinegar, sesame oil, and palm sugar and bring to a boil over medium-high heat.
  4. In a small bowl, whisk the 1 tsp arrowroot powder with 1 tsp water to form a paste. Stir it into the sesame mixture and cook about a minute more until it returns to a boil and thickens slightly. Remove from heat and set aside.
  5. Heat your grill to medium-high. Clean and oil the grill grates.
  6. Toss scallions with about 1/2 tsp oil and some salt to coat.
  7. Grill your steak to desired doneness (about 4-6 minutes per side). Transfer to a large cutting board and brush with about a third of the sesame sauce. Let the meat rest and prepare your scallions.
  8. Lower the heat to medium and grill the scallions until they are tender and have good grill marks (about 2-4 minutes per side).
  9. Transfer to a large platter and drizzle with a few spoonfulls of the sesame sauce.
  10. Toast the sesame seeds either in the oven, in a small pan on the stovetop, or create a little bowl out of aluminum foil and put it on the grill.
  11. Slice the steak thinly and serve with the scallions. Drizzle the remaining sesame sauce on top and sprinkle with some toasted sesame seeds.
Instead of regular sea salt, I tried out my special black lava sea salt and rubbed it into the steak.

Whisked up the marinade.


I ordered the coconut aminos from Amazon and found the sesame oil in the grocery store in the asian cooking aisle.

The start of the sauce...

Mmmm... sesame sauce!
Be sure to whisk the arrowroot powder completely into the water and avoid clumping.


Make sure your grill is nice and hot to sear in the flavor to the meat.


Saturday, April 28, 2012

Clarified Butter


About a month ago, I decided to add butter into my diet. I just can't find a good reason why I wouldn't eat it. The only acceptable form for me would be organic, grassfed, clarified butter, though. If you want to read into it, the Whole 9 discusses all the points in easy to understand terms in their Butter Manifesto. You can clarify butter at home on your stove easily.

There are two basic advantages to clarified butter over regular butter - health advantages and cooking advantages. For health reasons, buying grassfed/organic will eliminate toxins transferred from the animal to you through their crappy diet and living conditions. Clarifying the butter removes all the milk solids (aka milk proteins) which contribute to conditions like cardiovascular disease, cancer and autoimmune diseases, and produce other inflammation-related symptoms.

The cooking benefit of clarified butter is that it is very stable, and can be kept for long periods of time without going rancid. Clarified butter is also great for sauteing because it doesn't burn as easily as ordinary butter, so you can use it for cooking at hotter temperatures.

Here is the method for clarifying your butter:

  1. Ensure your butter is UNSALTED.
  2. Toss a bunch of sticks in a stock pot on low heat. As the butter melts and begins heating, the milk solids will rise to the top (see that white foam) and the water will cook off.
  3. As the milk solids collect along the surface of the butter, skim them off with a ladle. Do so until the butter becomes clear, almost like olive or grapeseed oil.
  4. Transfer melted butter to a glass (or otherwise sturdy and airtight) container by pouring it through a few layers of cheese cloth to catch any last little milk solids you may have missed. (That part with the cheesecloth is optional, but I recommend doing it.)
  5. Let the liquid cool, seal it up tight with a lid and put it in the fridge where it will harden up. Discard all the yucky milk solids.
I picked up this box of organic butter at Trader Joe's.

4 sticks of butter melting on low heat.. see how cloudy it is to start

milk solids are rising to the top

skim off milk solids with a ladle and put in a bowl off to the side
(discard these afterwards)

 
the butter is nice and clear now with the milk solids removed

as an extra measure, strain the butter through a few layers of cheesecloth

let cool before storing in the fridge in an airtight glass container

mmmm... butter!